Focaccia
beginners recipe + zuchini-basil-topping

english version below
Focaccia mit marinierter Zuchini, Fenchelsamen, grünen Oliven und Basilikumöl
Hallo ihr alle, die ihr diese Mail erhaltet. Erstmal wollte ich mich für das fleißige Abonnieren bedanken! Da die meisten doch eher Deutsch sprechen, hab ich mich jetzt dazu entschieden, die Rezepte zuerst auf Deutsch und dann auf Englisch anzuordnen. Ist ja sonst auch bisschen weird vielleicht. Ich freu mich über euer Interesse und versuche weiterhin ab und zu ein paar Rezepte hier verschriftlicht zu teilen. Wenn ihr Wünsche oder Anregungen habt, dann schreibt mir gerne - über Feedback freu ich mich sehr!
Heute gibt es ein Focaccia-Rezept - mit Hefe und am gleichen Tag gebacken. Ich werde mit Zeiten auch eine Sauerteig-Variante und eine zwei-Tage-Variante aufschreiben, wollte euch aber nicht gleich verschrecken. Das Rezept findet ihr auch in Video-Form auf meinem Instagram:
Ihr könnt natürlich die Toppings ganz nach eurem Belieben auswählen, weiter unten findet ihr meine grüne Variante mit Zuchini, Oliven, Basilikumöl und Fenchelsamen.
Zuerst einmal wollte ich aber ein paar Dinge aufschreiben, auf die ihr beim Focaccia machen achten solltet. Ich mach den Teig meist einfach nach Gefühl, da ihr das aber vielleicht noch nicht habt, sag ich mal, worauf ich dabei so achte:
1. Das richtige Mehl
Für Focaccia braucht es auch wieder ein eiweißreiches Mehl, welches viel Feuchtigkeit aufnehmen und schöne Blasen entwickeln kann. Daher hier auf einen Eiweißgehalt von über 11g, besser sogar mehr, achten. Hier braucht mensch aber nicht gleich zum Fachgeschäft zu rennen: Weizen Typ 550 und Dinkel Typ 630 funktionieren gut und gibts in jedem Supermarkt.
2. Geduldig sein
Focaccia-Teig braucht Zeit - je mehr desto besser! Das hängt auch wieder mit der Ausbildung der Glutenstränge zusammen und natürlich auch mit dem luftigen Volumen des Teiges: wir wollen schön viel Luft (Gas) im Teig haben, damit er am Ende schöne Blasen wirft. Ein paar Dinge, die mir dabei helfen, sind zum Einen eine lange Autolyse, das heißt, Mehl, Wasser und Triebmittel (Hefe oder Sauerteig) schon mischen und stehen lassen. Nach 30-60 Minuten ist der Teig spürbar geschmeidiger und entspannter als kurz nach dem Mixen. Des Weiteren gebe ich eine kleine Menge des Wassers erst nach der Autolyse mit dem Salz und dem Olibenöl hinzu. Der Teig muss dann erstmal zwar etwas länger wieder geknetet werden, bis er wieder geschmeidig ist, aber kann so viel mehr von der Flüssigkeit aufnehmen. Auch hier wieder die Regel: je wärmer, desto schneller und je kälter, desto langsamer wächst der Teig.
3. Falten
Um dem Teig ein starkes Gerüst zu geben wird er ungefähr alle halbe Stunde gefaltet. Falls ihr einschlaft oder das Haus verlassen müsst, keine Panik. Ein paar mal falten mehr oder weniger macht den Teig auch nicht besser oder schlechter. Je öfter ihr es tut, desto mehr werdet ihr aber feststellen, dass der Teig stabiler wird.
Rezept
400g Weizen Typ 550
100g Dinkel 630
370g warmes Wasser
halbe Packung Trockenhefe (ca. 3-4g)
1 TL Honig oder Agavendicksaft
10g Salz
Olivenöl
mehr warmes Wasser
Die Hefe mit dem Honig/ Agevendicksaft und den 370g waren Wasser mischen und kurz quellen lassen. Das Mehl hinzufügen und kneten, bis alles vermischt ist. Abgedeckt 30-60 Minuten abgedeckt stehen lassen.
Salz, einen weiteren Spritzer warmes Wasser und einen großzügigen Schuss Olivenöl hinzufügen und nochmal verkneten, bis der Teig wieder glatt ist.
Jetzt abgedeckt ca. 3-4 Stunden gehen lassen, dabei ungefähr alle halbe Stunde falten. Hier gerne die Hände mit Olivenöl einreiben, dann klebt der Teig nicht so an den Händen.
Den Teig ein gut eingeöltes Backblech geben und auseinander ziehen. Meist muss man ihn erstmal etwas ruhen lassen, bis er sich gut ziehen lässt. Jetzt Ofen auf 250 Grad vorheizen. Den Teig nochmal ca. 30 Minuten mit Olivenöl bepinselt (damit er nicht austrocknet) gehen lassen. Dann mit den eingeölten Fingern sanft eindrücken, sodass sich Bläschen bilden. Mit gewünschtem Topping (z.B sihe unten) belegen.
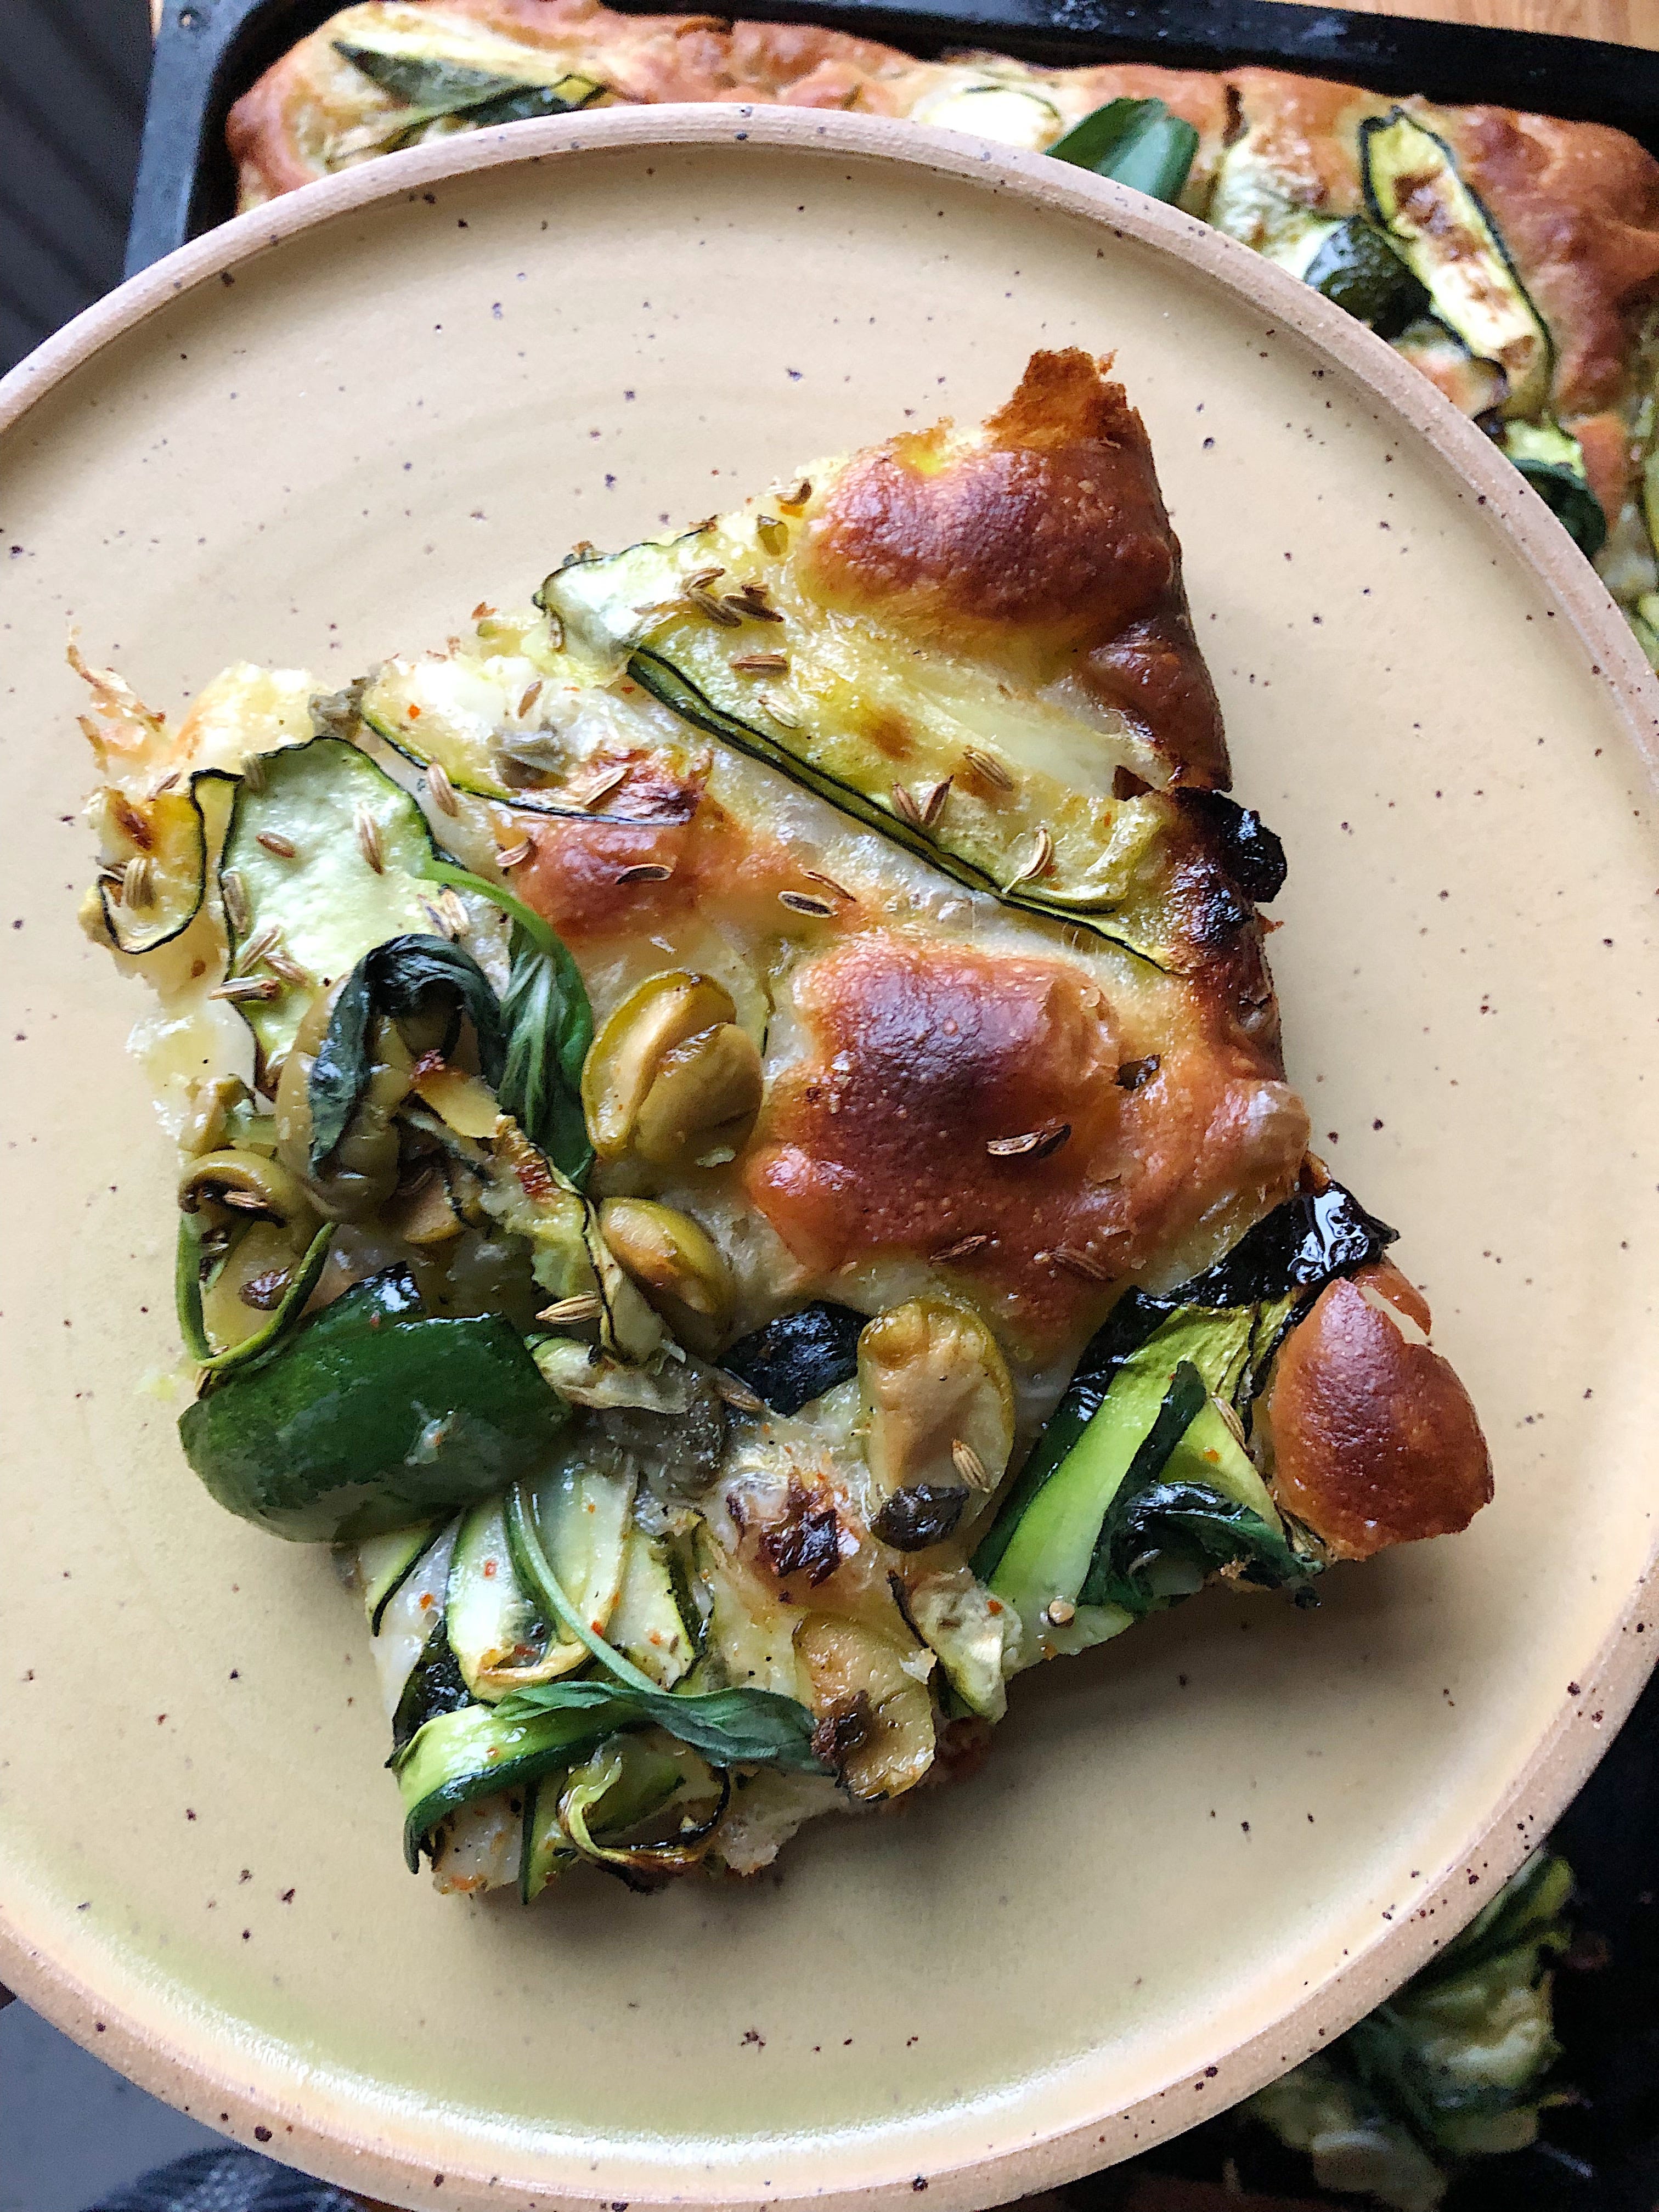
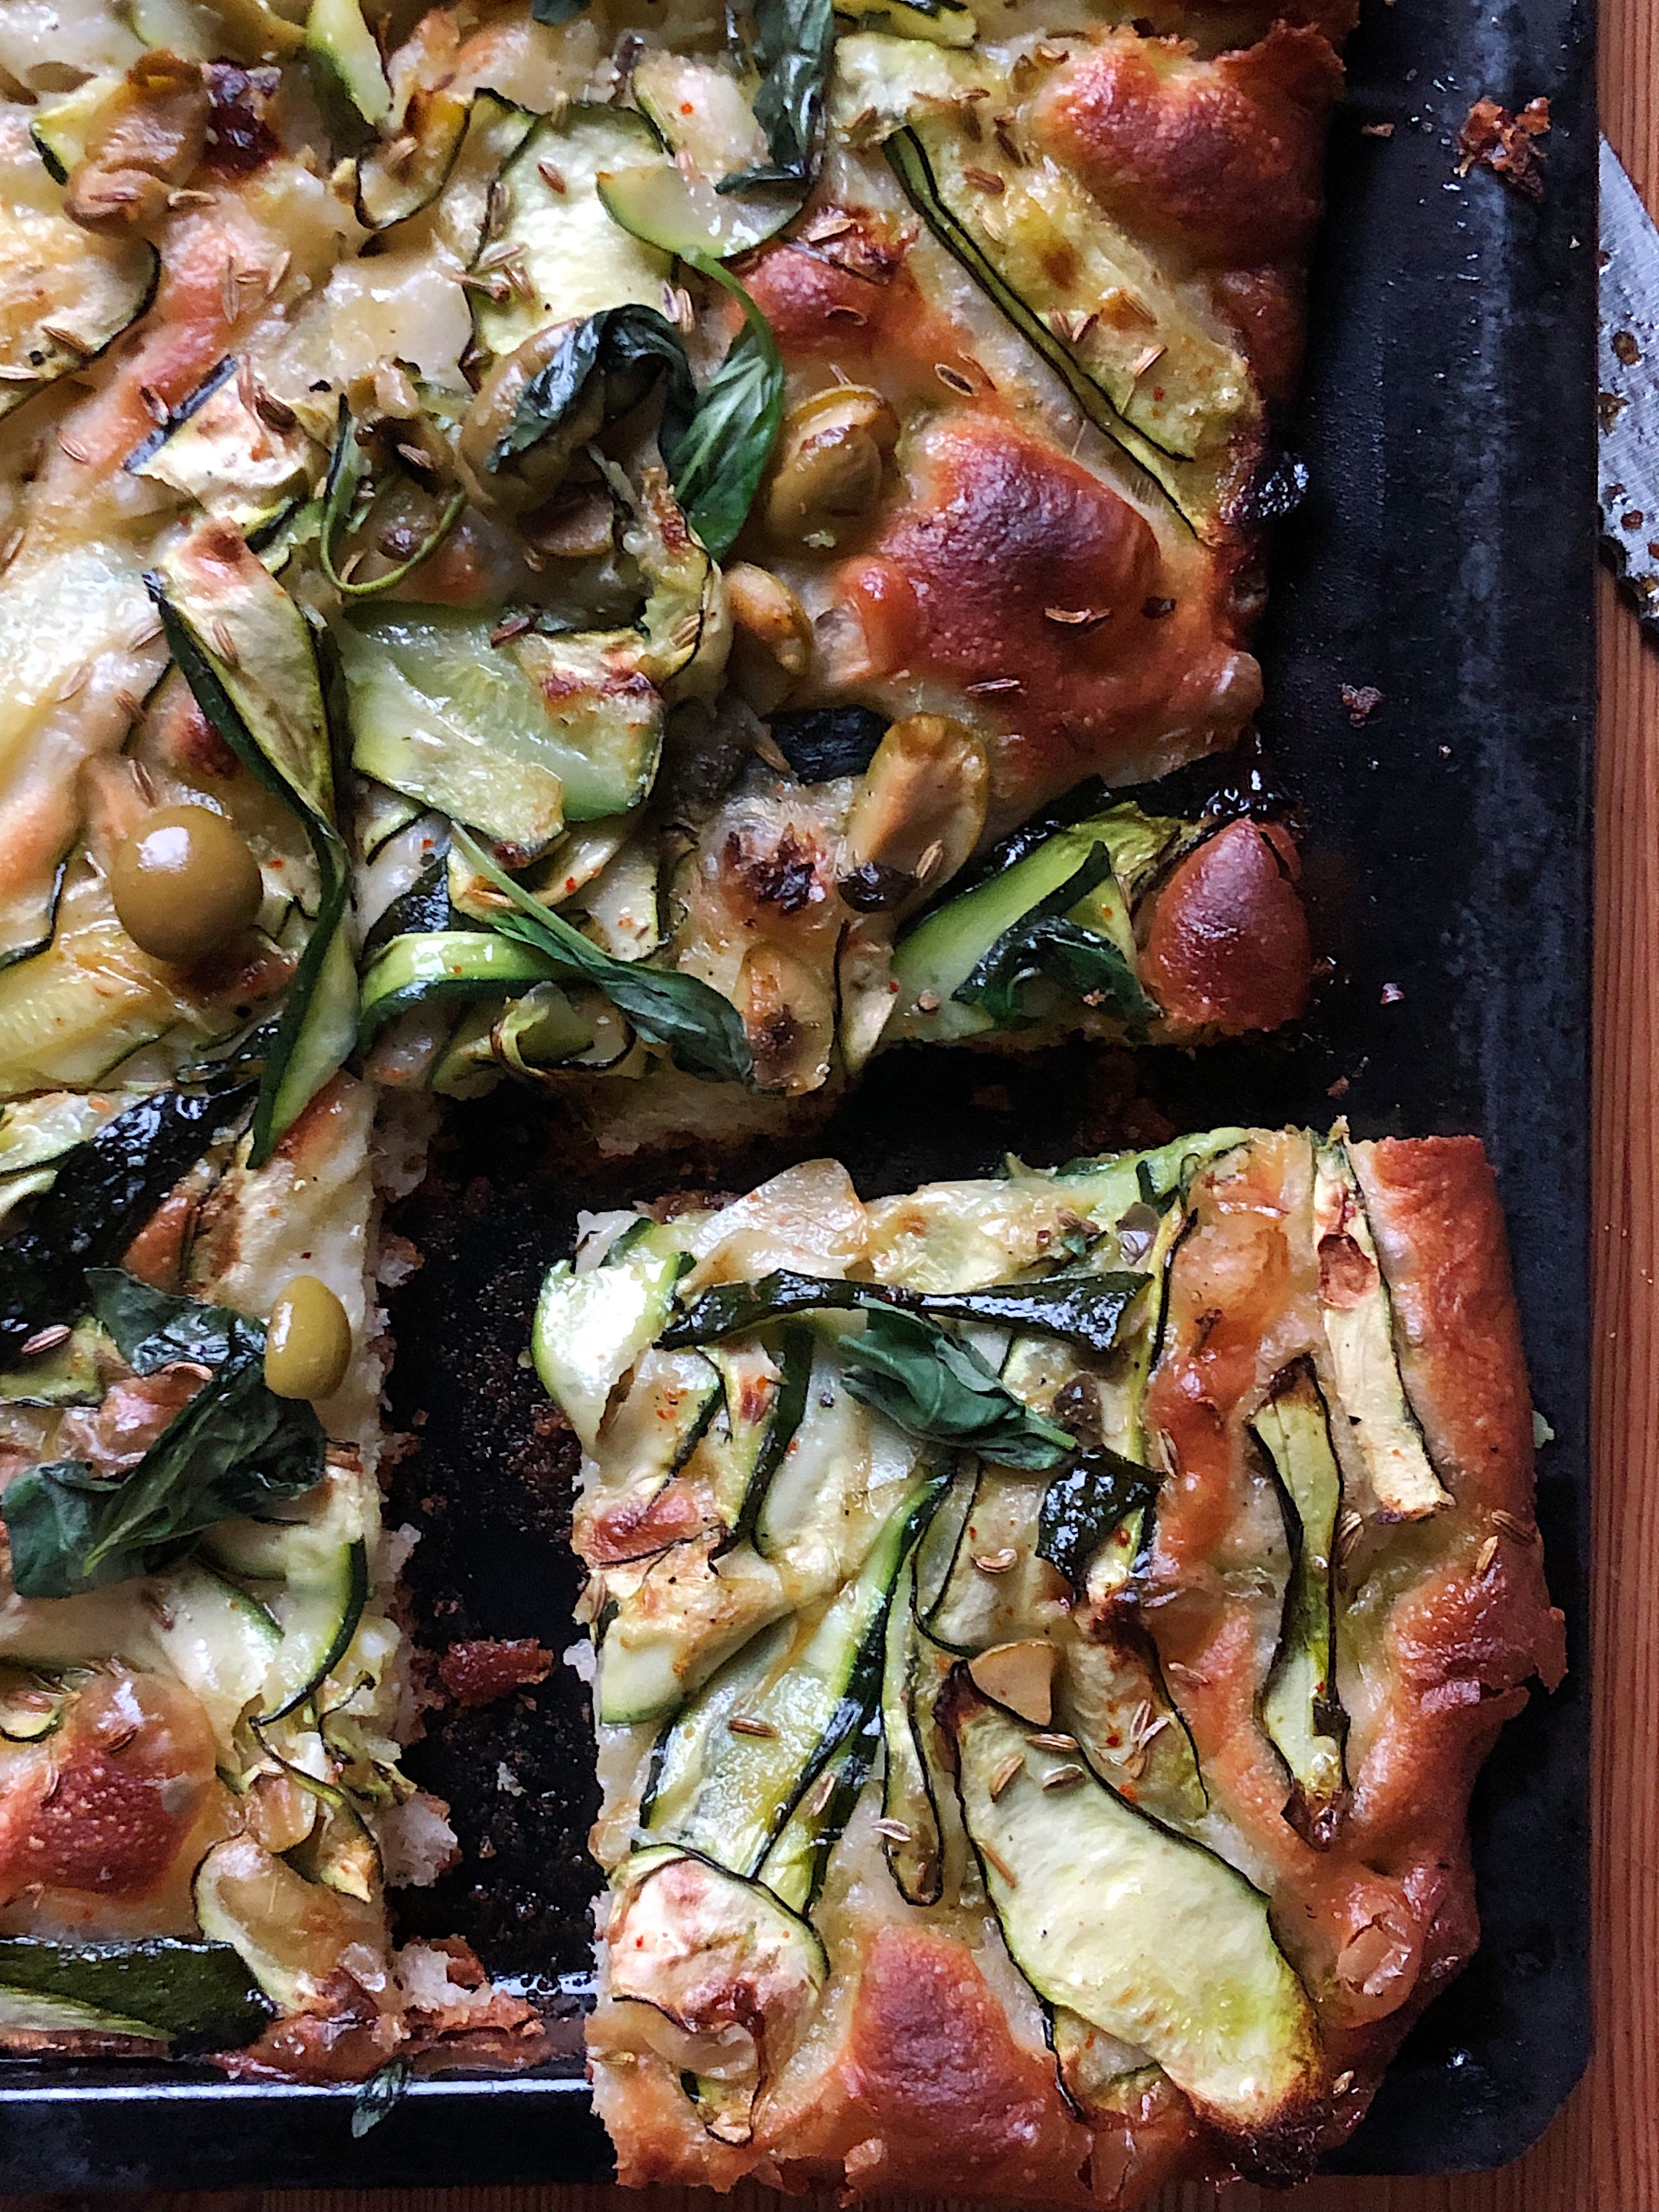
Bei 250 Grad für 10 Minuten, dann noch weitere 20 Minuten bei 220 Grad backen, bis gewünschte Bräune erreicht ist.
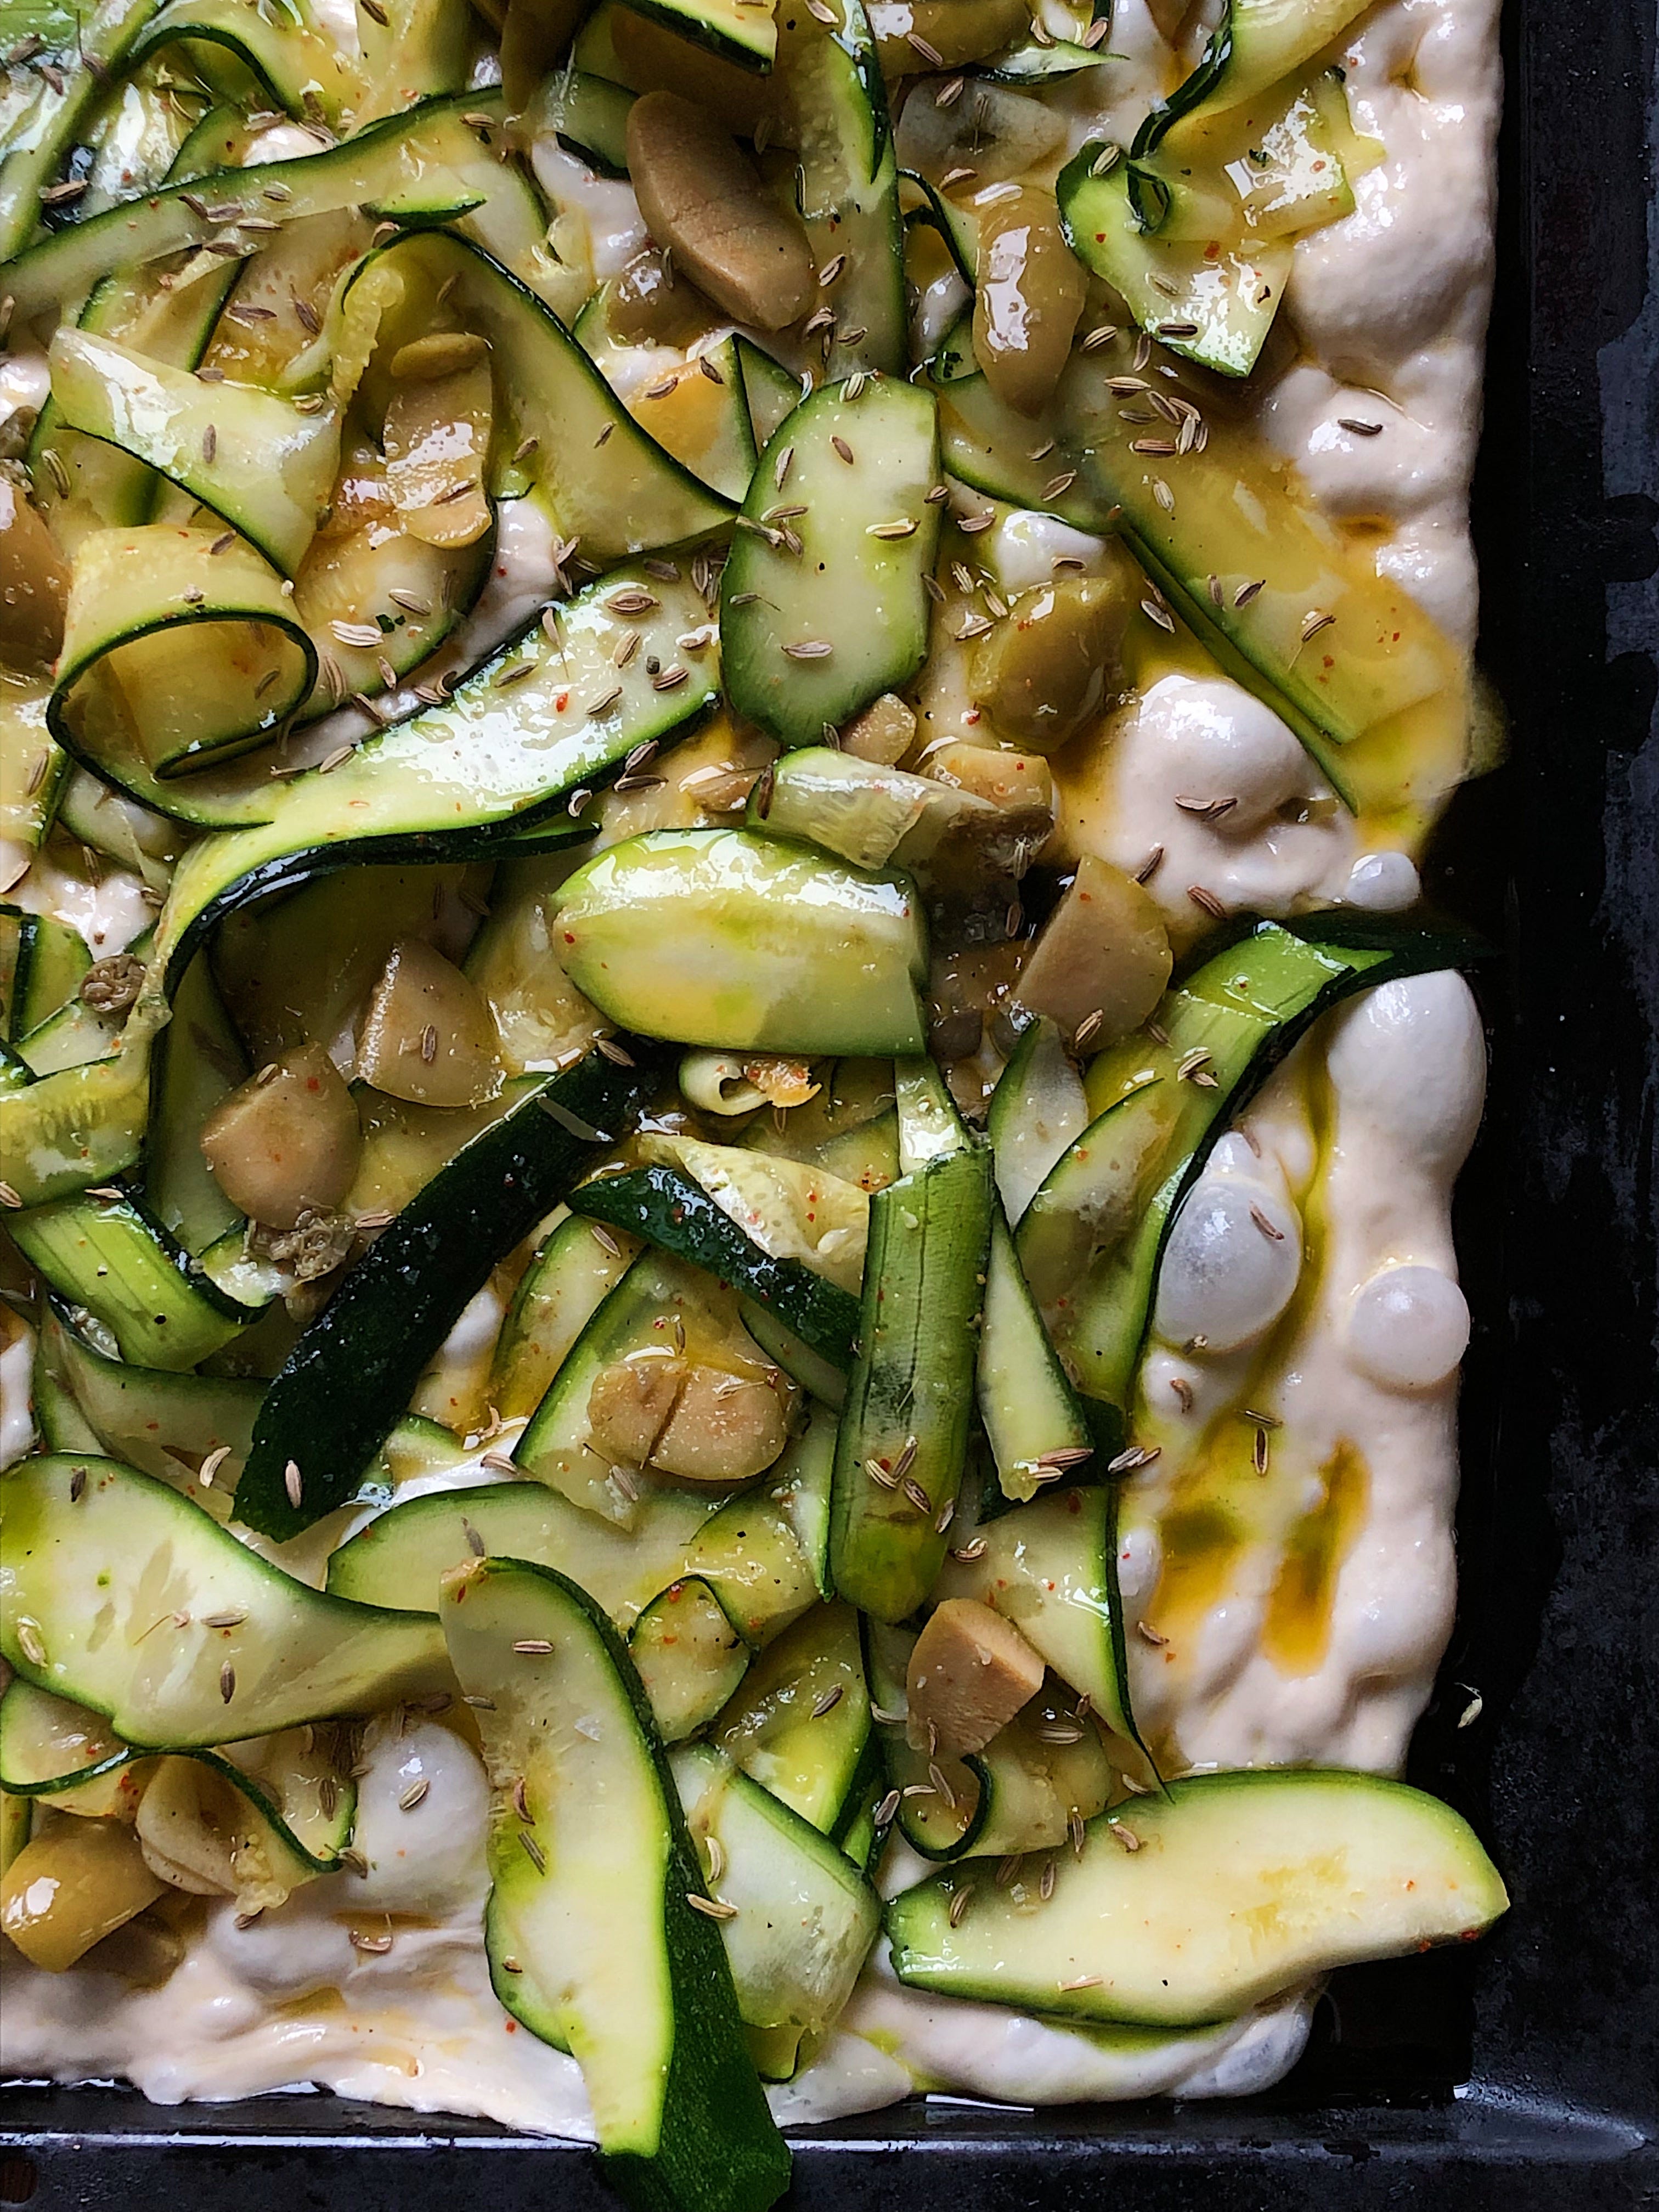
Zuchini-Basilikum-Topping
2 kleine Zuchini mit Sparschäler in Streifen geschält
eine Knoblauchzehe
Schale von einer halben Zitrone
Salz, Pfeffer, Chilli, Olivenöl
Zutaten vermischen und marinieren lassen für mindestens 30 Minuten.
1 Bund Basilikum
100-200ml Sonnenblumenöl
Basilikum und Öl im Mixer pürieren, bis der Basilikum sehr klein zerheckselt ist. Das Ganze dann ca 5-10 min in einem Topf auf mittlerer Flamme erhitzen, bis es blubbert und das Öl tiefgrün eingefärbt ist. Es fängt dann auch an, sich wieder etwas zu trennen. Durch ein mit einem feinen Tuch belegtes Sieb abgießen und auffangen. Fertig ist das Basilikumöl. Davon braucht ihr natürlich nicht alles, nehmt soviel wie ihr mögt. Hält sich im Kühlschrank für ein paar Wochen und kann wunderbar für viele andere Gerichte verwendet werden.
50g grüne Oliven
1 EL Fenchelsamen
Meersalz
Die Focaccia vor dem Backen mit den Toppings belegen und direkt nach dem Backen nochmal etwas vom Basilikumöl drüber geben.
Viel Spaß beim nachmachen!
Eure Olga
- English version -
Focaccia topped with courgettes, fennel seeds, green olives and basil oil
Hey everyone!
First things first: I wanted to say thank you for subscribing so far, it really means a lot. I decided to publish the recipes first in German and secondly in English, as I have a lot more German-natives subscribing. Also I want to encourage you to contact me if you have any wishes for future recipes, questions or feedback in general. I’m looking forward to get to know you better. :) I will try to publish more recipes of mine as often as possible but I also just started a new job so I can’t promise much…
Today I’m sharing a beginners focaccia recipe, using commercial yeast and no over night proofing.. I will also share a sourdough version and other more sophisticated versions in the future.
Focaccia really became one of my favorite things to make and eat. It’s great for picnics, dinners, lunches - you name it. Also, I find focaccia a very forgiving and adaptable dough. You just need to keep in mind a few factors:
1. Choose the right flour
Focaccia is usually a dough with a relatively high water quantity, therefore you need to build a good gluten structure to allow your flour to hold all the water and form nice bubbles. That’s why you should use a flour with a higher protein percentage (aka more gluten), somwhere above 11-12g protein per 100g is fine. The higher, the better! In America or the UK you would use bread flour, in Germany I would use Weizen 550 with a little bit of spelt or whole wheat flour mixed in.
2. Have patience
Focaccia dough really relies on your patience! You want to give the gluten a chance to relax and form gluten strains, which will give the dough its strength and leave you with a bubbly and pillowy end result. Therefore I found that a long autolyse (mixing only flour and water before adding salt) as well as a long bulk fermentation (and preferably also a cold over night fermentation) gives you the best results. But this also depends on the temperature you’re dealing with. If it is very cold, like now, it will take you much longer than in the summer, where you could let your dough proof on the balcony (lovely surprise for your roommates ;) ). So, just let your dough expand and grow! I’m also not so much afraid of overproofing my focaccias, because we don’t really need to shape it, so it’s much more forgiving.
3. Just fold it
To build the gluten strength, you have to do simple folds from time to time: just grab the edges of the dough and fold it over it self. Do this every 30 minutes-ish and you will feel your dough getting stronger every time. Also: you can easily add olive oil on your hands or the dough, so it won’t stick that much. It’s a perfect addition to your focaccia anyways.
Recipe
Ingredients
400g flour (bread flour/ Weizen Typ 550)
100g spelt flour
10g salt
Olive oil
4g dry yeast
1 teaspoon sweetener
Method
Mix yeast with sweetener and 370 g warm water. Let it bloom for 5 minutes, then add the flours and combine with your hands. It should be a very wet and soft dough, but it doesn’t have to be very smooth yet. Let sit for 30-60 minutes covered (depending on how warm the room is). You will notice that the dough is much softer than before.
Try to incorporate all the dry bits before mixing in the salt. I like to put water on my hands and scrub around the bowl with my bench scraper to incorporate all the dry bits on the bottom.
Mix your salt into another 30-50g of warm water, then add onto the dough and mix by hand until your salt is incorporated. Also add a few tablespoons of olive oil along the water and salt mixture. Cover again and let it proof for about 3-4 hours (shorter when it’s really warm and longer when it’s really cold and doesn’t expand that fast). You can now perform a stretch and fold every 30 minutes (as described above). But please - don’t worry if you have to leave the house/ fall asleep or anything. A few folds will do absoultely fine and it’s also no big deal if they don’t happen exactly every half an hour.
Once your dough has proofed and doubled in size (roughly) add it to a generously oiled baking tray (with olive oil please!) and let it sit for 20-30 minutes, before spreading it out with even more oil. If it springs back a lot, just let it rest a few minutes and do it again. Let it proof again for a bit. Now is also the time to preheat your oven to 250 degrees celsius. You can now do the famous focaccia dimples by putting your oiled fingers in the dough and trying to create some air bubbles.
Then add your toppings (or just more olive oil and salt) and bake for 10 minutes at 250 degrees, then turing down to 220 degrees for another 20 minutes or until desired browning. Brush with more olive oil and enjoy!
Courgette-Basil-topping
2 small courgettes (or zuchini) peeled into long stripes
2 garlic cloves
peel of half a lemon
salt, pepper, chilli flakes, olive oil
Mix all the ingredients and let them marinate fo at least 30 minutes.
1 bunch of basil
100-200 ml neutral oil
Mix oil and basil in a mixer until it has a fine and pureed texture. Heat in a small pot at medium temperature until it basil and oil starting to seperate and the oil takes a deep green colour. Takes about 5-10 minutes. Strain through a cheese cloth over a sieve and preserve in a bottle. You won’t need everything, just use as much as you want. The rest keeps fresh in the fridge for a few weeks and can be used for a lot of other recipes.
50g green olives
1 tablespoon fennel seeds
sea salt flakes
Before baking put the toppings on the focaccia. Right after baking you can put more basil oil if desired.
Happy baking!
Yours,
Olga